Fixing A Hole In An Orbeez Stress Ball: A Complete Guide

Kidplayco is an affiliate website. If you purchase a product using our links we might be compensated. See Disclosure.
Hey there, fellow Orbeez splat stress ball enthusiasts! I’ve got a tale to tell you about the epic battle I waged against the treacherous hole in my beloved Orbeez stress ball.
Picture this: It’s a lazy Sunday afternoon, and I’m lounging on my couch, squeezing my beloved Orbeez stress ball with reckless abandon. But alas! Out of nowhere, disaster strikes! I hear a faint “pop,” and suddenly, there it is—a hole, a breach in the fortress of tranquility.
Now, I’m no stress ball surgeon, nor am I a wizard of sorts, but I am armed with determination and a slightly misguided sense of humor. With a twinkle in my eye and a pinch of optimism, I embark on a mission to fix this hole in my Orbeez stress ball.
And in case you are someone like me, here is a detailed guide as to how I did give it a sneaky fix.
How to Fix a Hole in Orbeez Stress Ball?
Orbeez stress balls are incredibly popular for their soothing texture and stress-relieving properties. However, even the most durable stress balls can develop holes over time due to wear and tear.
If you find a hole in your Orbeez stress ball, here is what you can do.
Assess the Damage
Before proceeding with the repair, it’s essential to assess the extent of the damage to your Orbeez stress ball. This step will help you determine the best approach for fixing the hole and ensure a successful repair. Here’s how you can assess the damage:
- Size of the Hole: Take a close look at the hole in your stress ball and evaluate its size. Is it a small pinhole or a larger tear? Understanding the size of the hole will give you an idea of how much material needs to be repaired.
- Additional Cracks or Leaks: While inspecting the stress ball, check for any additional cracks or leaks in the material. These may not be immediately visible, so it’s important to examine the entire surface of the stress ball thoroughly. Identifying any additional damage will help you address it along with the primary hole.
- Loss of Orbeez: Assess whether the hole has caused a significant loss of Orbeez from the stress ball. If a large number of Orbeez have escaped through the hole, you may need to consider refilling the stress ball with a replacement packet of Orbeez during the repair process.
- Structural Integrity: Pay attention to the overall structural integrity of the stress ball. If the material is too worn, brittle, or damaged in multiple areas, it may be challenging to achieve a long-lasting repair. In such cases, you may need to consider replacing the stress ball altogether.
By carefully assessing the damage, you’ll have a clear understanding of the repair requirements and be better prepared to fix the hole effectively. It will also help you determine if the stress ball is salvageable or if it’s time for a replacement.
Gather the Necessary Supplies
To fix a hole in an Orbeez stress ball, you’ll need a few supplies, which are readily available at most craft or hardware stores.
Make sure you have the following items before you begin:
- A replacement Orbeez packet: In case the stress ball has lost too many Orbeez due to the hole, a replacement packet will help replenish them.
- A small pair of scissors or a craft knife: You’ll need this to cut and trim the stress ball material.
- Piece of Fabric: To use it as a cover over the hole on the stress ball.
- A strong adhesive: Look for a non-toxic, waterproof adhesive that can bond the Orbeez stress ball material effectively.
- Latex or nitrile gloves (optional): Wearing gloves can help protect your hands and keep the repair process clean.
By gathering these supplies before you begin the repair, you’ll have everything you need within reach, saving you time and effort. It’s always better to be prepared, as it allows for a smoother and more efficient repair experience.
Note: Depending on the specific situation, you may require additional tools or supplies. For instance, if the stress ball has a large hole or tear, you may need a patch material or fabric to reinforce the repair.
Step-by-Step Orbeez Splat Stress Ball Repair Guide
Now that you have everything you need, let’s dive into the step-by-step process of fixing a hole in an Orbeez stress ball:
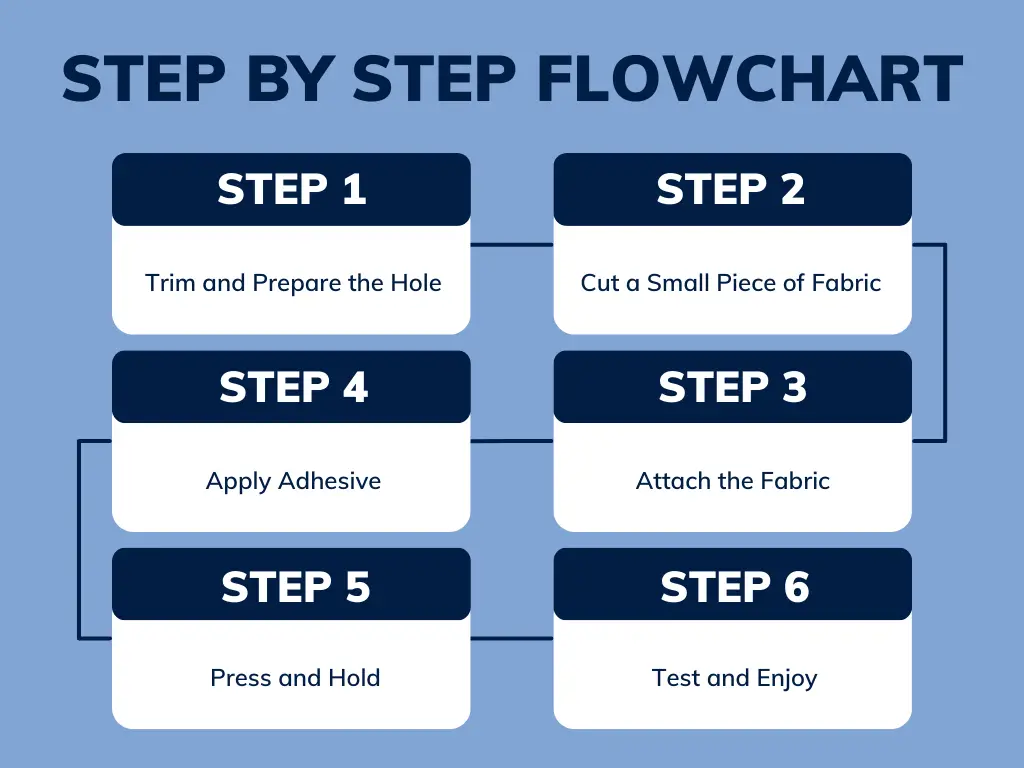
Step 1: Trim and Prepare the Hole
Using a small pair of scissors or a craft knife, carefully trim any loose or frayed material around the hole. This will create a clean surface for the repair. Be cautious not to enlarge the hole further during this process. By preparing the hole, you’ll have a better foundation for the adhesive to adhere to.
Step 2: Cut a Small Piece of Fabric
To reinforce the repair and provide additional strength, cut a small piece of fabric using your scissors. Make sure the fabric is large enough to cover the hole in your Orbeez stress ball.
Step 3: Attach the Fabric
Place the fabric over the hole and press down firmly. Ensure that the fabric completely covers the hole and that the edges are glued down securely. This additional layer of fabric will reinforce the area and prevent further damage or tearing.
Step 4: Apply Adhesive
Choose a strong adhesive that is suitable for bonding the fabric and the material of your Orbeez Splat Stress Ball. Apply a small amount of adhesive around the edges of the fabric, ensuring an even distribution.
Be careful not to use too much adhesive, as it may overflow or create a messy appearance. Follow the manufacturer’s instructions for the recommended drying time.
Note: You can also stitch the fabric over the hole after applying the adhesive to give it a more solid finish.
Step 5: Press and Hold
Gently press the edges of the fabric and stress ball together, aligning them properly. Apply firm pressure for a few minutes to allow the adhesive to set and bond the materials securely. This step ensures a strong and durable repair. Be patient and give the adhesive enough time to dry completely.
Step 6: Test and Enjoy
After the adhesive has fully cured, it’s time to test your repaired Orbeez stress ball. Squeeze it gently to check if the hole remains closed and secure. If you notice any air leaks or additional damage, repeat the repair process, or consider seeking alternative solutions.
Once you’re satisfied with the repair, it’s time to enjoy the soothing properties of your Orbeez stress ball once again. Squeeze, squish, and manipulate the stress ball to your heart’s content, feeling the satisfying sensation of the Orbeez beneath your fingertips.
Also See: Do Orbeez Dry Out
Video Guide
Tips to Maintain Your Repaired Orbeez Stress Ball

While knowing how to fix a hole in an Orbeez stress ball is valuable, it’s even better to prevent holes from occurring in the first place.
Here are some useful tips to help you keep your Orbeez ball in excellent condition.
1. Avoid Sharp Objects
After repairing your Orbeez stress ball, it’s important to prevent any further damage. Avoid placing it near sharp objects or surfaces that could puncture or tear the material. Keep it away from scissors, knives, or any other sharp tools. Additionally, be cautious about where you store your stress ball to minimize the risk of accidental damage.
2. Clean with Care
Over time, your Orbeez stress ball may accumulate dirt or become sticky due to oils from your hands. To clean it, use a mild soap and warm water. Gently scrub the surface of the stress ball with your hands or a soft cloth, paying attention to any particularly dirty areas.
Avoid using harsh chemicals or abrasive cleaners, as they can damage the material or strip away its vibrant colors. Rinse the stress ball thoroughly and allow it to air dry completely before using it again.
You May Also Like: How to Store Orbeez
3. Store Properly
Proper storage is crucial for maintaining the quality and longevity of your repaired Orbeez stress ball. Find a cool, dry place to keep it when not in use. Excessive exposure to sunlight or heat can cause the material to degrade, fade, or become brittle.
Avoid leaving the stress ball in direct sunlight or near sources of heat, such as radiators or heaters. Consider storing it in a drawer, a dedicated container, or a shelf away from direct sunlight and extreme temperatures.
4. Avoid Prolonged Exposure to Water
While Orbeez stress balls are designed to be water-resistant, it’s still best to avoid prolonged exposure to water. While a brief encounter with water during cleaning is fine, leaving the stress ball submerged or excessively wet for extended periods can weaken its surface, leading to a potential puncture.
5. Use Gentle Handling Techniques
To prolong the lifespan of your repaired Orbeez stress ball, handle it gently and avoid applying excessive force or squeezing too aggressively.
While it’s meant to be squished and manipulated, excessive force or rough handling can put a strain on the material and potentially lead to holes or tears. Encourage a softer and more controlled squeezing motion to enjoy the stress-relieving benefits without causing unnecessary damage.
By following these maintenance tips, you can help preserve the quality and functionality of your repaired Orbeez stress ball. Proper care and attention will ensure that you can continue to enjoy its soothing and stress-relieving properties for a long time to come.
Conclusion
Fixing a hole in an Orbeez splat ball is a simple and rewarding task that allows you to extend the life of your beloved squishy toy. By following the step-by-step guide provided in this article, you can repair the hole with ease, ensuring that your stress ball remains intact and functional for continued enjoyment.
Remember to gather the necessary supplies, assess the damage, and proceed with the repair process patiently. With a little time and effort, you can restore your Orbeez stress ball to its former glory, providing you with countless moments of relaxation and stress relief.
So, the next time you discover a hole in your Orbeez stress ball, don’t fret. Instead, follow the steps outlined in this guide, and soon enough, you’ll be back to squeezing and squishing your stress away!